组件之间的通信
一、父子组件之间的通信
1.父传子
父组件传递数据给子组件通过props属性;
Props是你可以在组件上注册一些自定义的attribute;
父组件给这些attribute赋值,子组件通过attribute的名称获取到对应的值;
Props有两种常见的用法:字符串数组和对象类型;
(1)基本使用
- 字符串数组
- 对象类型:可以限制attribute的类型,是否必须,默认值
父组件:
<template>
  <div>
    <!-- 方式一:父组件注册一些自定义的attribute直接传数据,子组件通过props接受 -->
    <!-- <show-message title="hhaha" content="dfls"></show-message> -->
    <!-- 方式二:父组件注册一些自定义的attribute传递data中的数据,如数组、对象等类型,子组件通过props接受 -->
    <show-message :title="title" :content="content"></show-message>
  </div>
</template>

<script>
import ShowMessage from './ShowMessage.vue'
  export default {
    components: {
      ShowMessage
    },
    data() {
      return {
        title: "班底改变",
        content: {
          name: 'tjx',
          age: 19
        }
      }
    }
  }
</script>
子组件:
<template>
  <div>
    <h2>{{ title }}</h2>
    <h2>{{ content.name }}</h2>
    <h2>{{ content.age }}</h2>
  </div>
</template>

<script>
export default {
  // 数组和对象
  // 1.数组 只能告诉名称,直接通过名称使用
  // props: ["title", "content"]

  // 2.对象 可以指定名称以及类型等
  props: {
    title: String,
    content: {
      type: Object,
      // 必传
      // required: true,
      // 默认值 当type为Object时这里提示default要为function
      default() {
        return {
          name: "",
          age: 0,
        };
      },
    },
  },
};
</script>
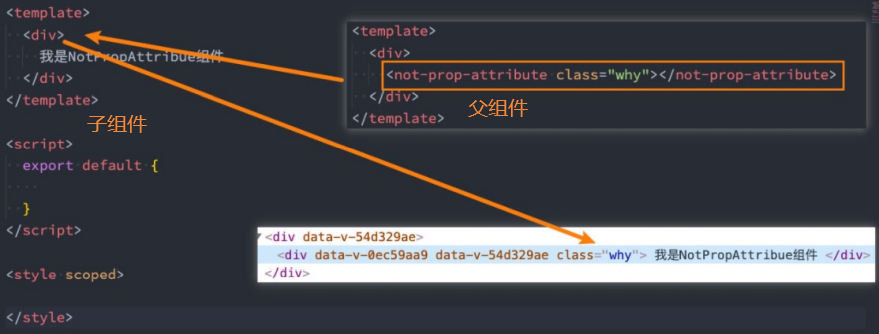
(2)非Prop的Attribute
什么是非Prop的Attribute呢? 当我们传递给一个组件某个属性,但是该属性并没有定义对应的props或者emits时,就称之为 非Prop的 Attribute;常见的包括class、style、id属性等;
- 当组件有单个根节点时,非Prop的Attribute将自动添加到根节点的Attribute中(attribute的继承);
2.子传父
子组件将数据传递给父组件通过**$emit**触发事件;
- 首先,需要在子组件中定义好在某些情况下触发的事件名称;
- 其次,在父组件中以v-on的方式传入要监听的事件名称,并且绑定到对应的方法中;
- 最后,在子组件中发生某个事件的时候,根据事件名称触发对应的事件;
父组件:
<template>
  <div>
    <h2>当前计数:{{counter}}</h2>
    <!-- 父组件通过v-on(@)的方式传入要监听的事件名称,并绑定到对应的方式中去 -->
    <counter-operation @add="addOne" @sub="subOne" @addN="addNum"></counter-operation>
  </div>
</template>

<script>
import CounterOperation from "./CounterOperation.vue"
  export default {
    data() {
      return {
        counter: 0
      }
    },
    components: {
      CounterOperation
    },
    methods: {
      addOne() {
        this.counter++
      },
      subOne() {
        this.counter--
      },
      // 传递的参数n
      addNum(n) {
        this.counter += n
      }
    }
  }
</script>
**子组件:**内部其实是监听两个按钮的点击,点击之后通过 this.$emit的方式发出去事件
<template>
  <div>
    <button @click="increment">+1</button>
    <button @click="decrement">-1</button>
    <input type="text" v-model.number="num" />
    <button @click="incrementN">+n</button>
  </div>
</template>

<script>
export default {
  methods: {
    // 注册需要触发的时间
    // 1.数组写法 (定义事件名)
    // emits: ["add", "sub", "addN"],
    // 2.对象写法 (可以对传递的参数进行验证)
    // 定义事件名
    emits: {
      add: null,
      sub: null,
      addN: payload => {
        // 验证参数是否符合要求
        if (payload > 10) {
          // 为true时传递
          return true
        }
        return false
      }
    },
    // 子组件通过监听按钮的点击事件,然后通过$emit的方式将事件发送出去
    increment() {
      this.$emit("add");
    },
    decrement() {
      this.$emit("sub");
    },
    incrementN() {
      // 传递参数
      this.$emit("addN", this.num)
    },
  },
  data() {
    return {
      num: 0,
    };
  },
};
</script>
二、非父子组件之间的通信
1.Provide和Inject
父组件有一个 provide 选项来提供数据;
子组件有一个 inject 选项来开始使用这些数据;
爷组件:
<template>
  <div>
    <home></home>
    <button @click="addName">addName</button>
  </div>
</template>

<script>
import Home from "./Home.vue";
import {computed} from "vue"
export default {
  components: {
    Home,
  },
  // 基本使用
  // provide: {
  //   name: "tjx",
  //   age: 18
  // }
  // 写成一个函数就可以调用data中的数据
  provide() {
    return {
      name: "tjx",
      age: 18,
      // 如何让这里变成响应式的? 使用computed函数
      length: computed(() => this.names.length)
    };
  },
  data() {
    return {
      names: ["agc", "bsd"]
    }
  },
  methods: {
    addName() {
      this.names.push("tjxyn")
    }
  }
};
</script>
孙组件:
<template>
  <div>
    <h2>{{name}} {{age}} {{length}}</h2>
  </div>
</template>

<script>
  export default {
// 注入
    inject: ["name", "age", "length"]
  }
</script>
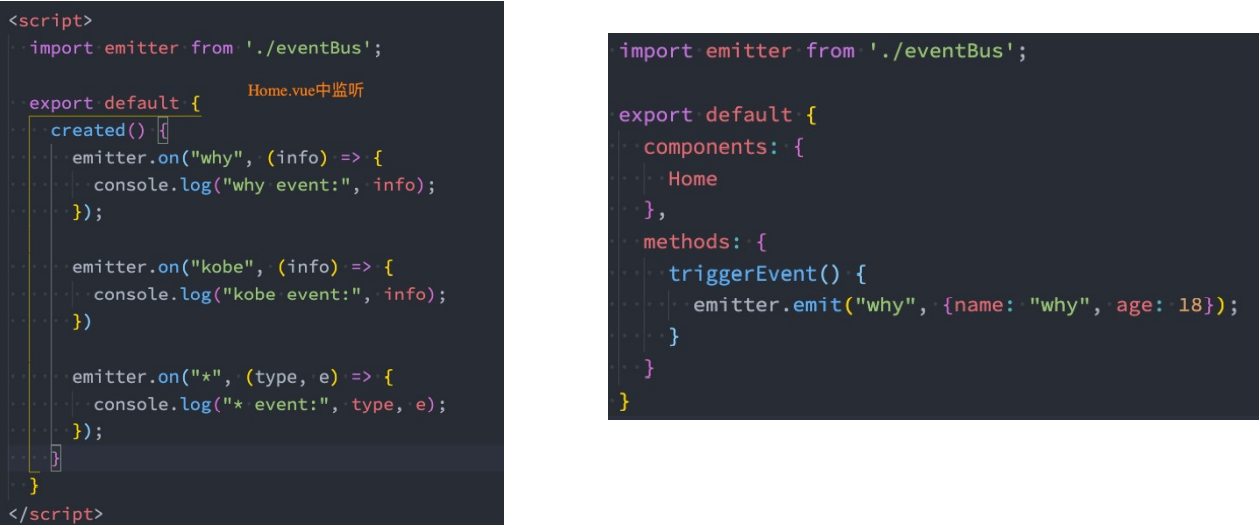
2.全局事件总线miit库
Vue3从实例中移除了 $on、$off 和 $once 方法,所以我们如果希望继续使用全局事件总线,要通过第三方的库: Vue3官方有推荐一些库,例如 mitt 或 tiny-emitter;
安装:npm install mitt
封装工具:eventbus.js
import mitt from "mitt"
const emitter = mitt();
export default emitter;
- 在Home.vue中监听事件;
- 在App.vue中触发事件;
Mitt的事件取消:
// 取消emitter中所有的监听
emitter.all.clear()

// 定义一个函数
function onFoo() {}
emitter.on('foo', onFoo) // 监听
emitter.off('foo', onFoo) // 取消监听
三、插槽
Vue中将 元素作为承载分发内容的出口;
在封装组件中,使用特殊的元素就可以为封装组件开启一个插槽;
该插槽插入什么内容取决于父组件如何使用;
1.基本使用
App.vue:
<template>
  <div>
    <!-- 基本使用: 直接插入内容 -->
    <my-slog-cpn>
      <button>我是按钮</button>
    </my-slog-cpn>

    <!-- 插入自己的组件 -->
    <my-slog-cpn>
      <my-button></my-button>
    </my-slog-cpn>

    <!-- 插槽默认值 -->
    <my-slog-cpn></my-slog-cpn>

    <!-- 插入很多内容 -->
    <my-slog-cpn>
      <!-- 所有内容都替换插槽 -->
      <h2>哈哈哈</h2>
      <button>按钮</button>
      <strong>strong</strong>
    </my-slog-cpn>
  </div>
</template>

<script>
import MySlogCpn from "./MySlotCpn.vue";
import MyButton from "./MyButton.vue";
export default {
  components: {
    MySlogCpn,
    MyButton,
  },
};
</script>
MySlogCpn.vue:
<template>
  <div>
    <h2>组件开始</h2>
    <slot>
      <i>默认值1</i>
    </slot>
    <slot>
      <i>默认值2</i>
    </slot>
    <h2>组件结束</h2>
  </div>
</template>

<script>
  export default {}
</script>
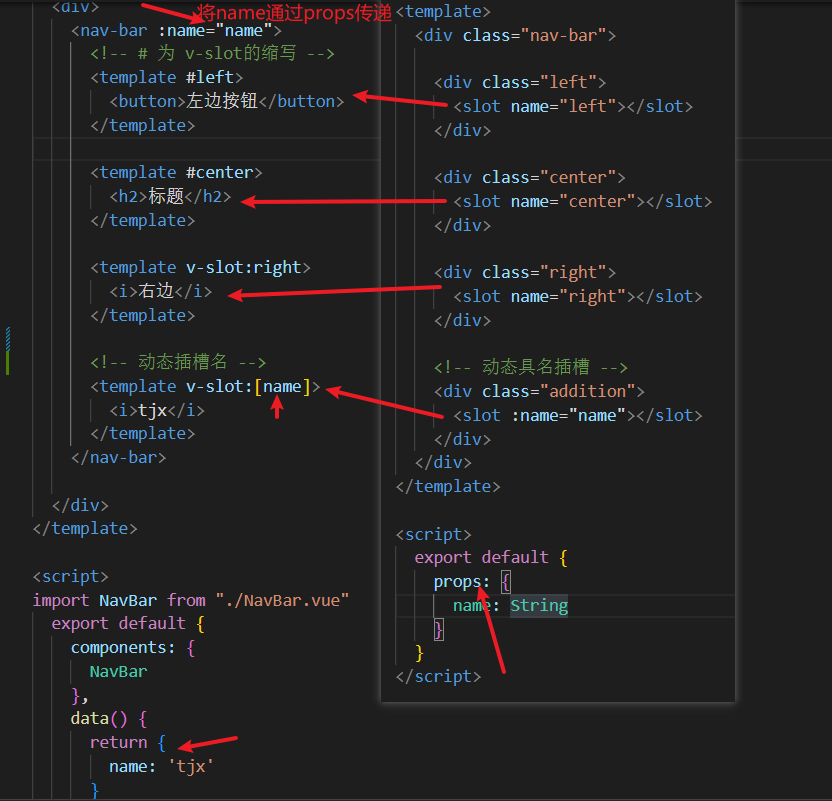
2.具名插槽
3.作用域插槽
有时候希望插槽可以访问到子组件中的内容是非常重要的: 当一个组件被用来渲染一个数组元素时,我们使用插槽,并且希望插槽中没有显示每项的内容;这个Vue给我们提供了作用域插槽;
- 基本使用
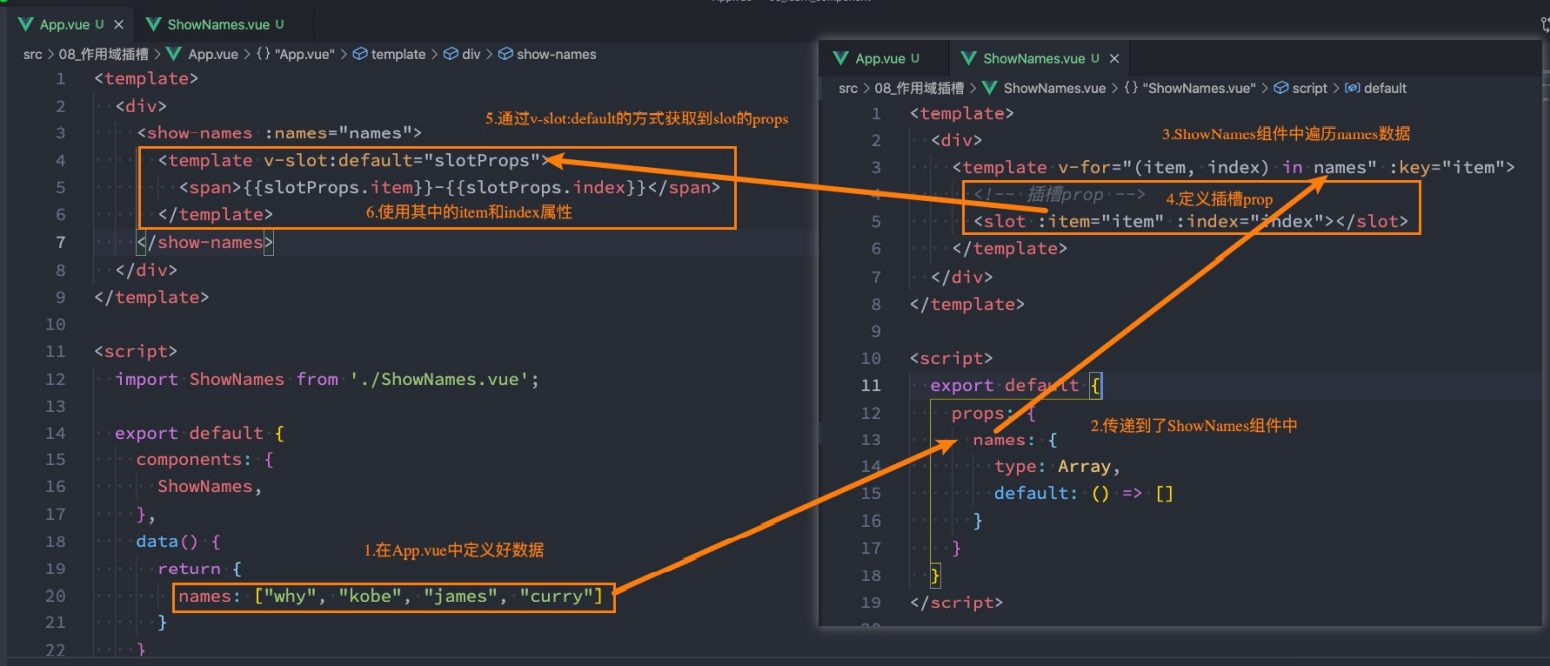
- 果我们的插槽是默认插槽default,那么在使用的时候
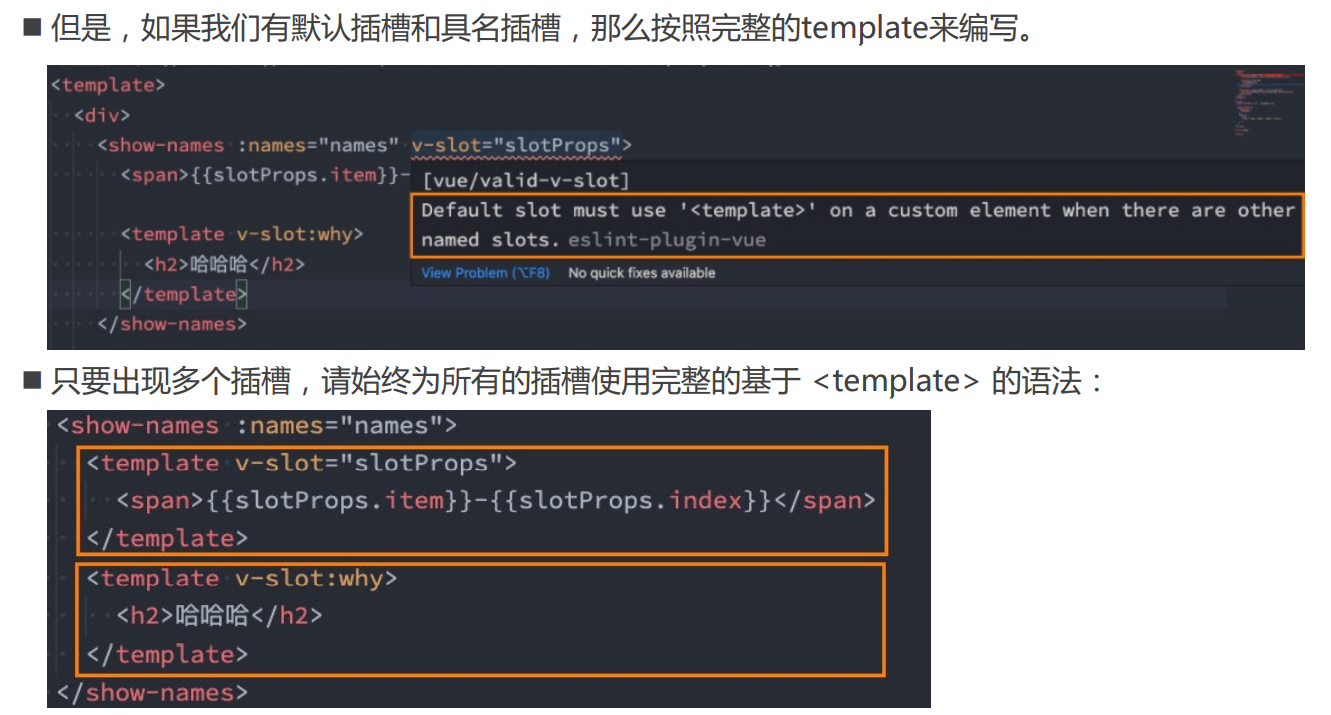
v-slot:default="slotProps"可以简写为v-slot="slotProps" - 并且如果我们的插槽只有默认插槽时,组件的标签可以被当做插槽的模板来使用,这样,我们就可以将 v-slot 直 接用在组件上:
<show-names :names="names" v-slot="slotProps">
    	<span>{{slotProps.item}}-{{slotProps.index}}</span>
</show-names>
- 默认插槽和具名插槽混合